Manual
MusicServer Connect 1.6 · Status:
MusicServer Connect gives VirtualDJ access to your music servers: search and play tracks, browse artists, albums and genres, manage playlists and favourites, and download files or keep them available offline.
Choose a topic on the left. Use the triangles to expand or collapse chapters. The images show the plugin running in VirtualDJ. Features of individual servers are described in the relevant sections.
Connection and getting started
Requirements and installation
You need VirtualDJ for Windows with support for online sources, the plugin and an accessible music server with UPnP/DLNA or OpenSubsonic/Subsonic. The music server must have already added your files to its catalog. This shows which servers and metadata have been checked Compatibility list.
For manual installation, close VirtualDJ and copy MusicServer Connect.dll in the folder %LOCALAPPDATA%\VirtualDJ\Plugins64\OnlineSources then start VirtualDJ. VirtualDJ must also be closed when replacing an existing DLL. Check the installed version under About .
Open and connect plugin
- Open VirtualDJ in the left browser tree Online Music → MusicServer Connect.
- Open the connection dialog from the login notice in the track list or the plugin entry’s context menu. VirtualDJ may label this command Log in .
- Select a discovered UPnP server or enter its URL. For OpenSubsonic, also enter your username and password or the required API key.
- Wait for the protocol detection and click Connect or Sign in.
- Expand the plugin entry and open All tracks. The initial library build may take some time depending on the server and library size.
Connect UPnP and search server again
The connection dialog lists UPnP servers found on the network. Select a server to use its address. When UPnP is detected, username and password remain disabled. For manual setup, enter your server’s reachable network address and port.
The button with the circular arrows to the left of the list starts the server search again. While searching, the icon rotates to show the list Searching for UPnP servers... in grey, with both controls disabled. When servers are available, the text turns white. If no servers are found, the list stays grey and disabled. Manually entered connection details are retained.
This search discovers servers; it does not start a new music scan on the NAS. If nothing is found, check the network and running media server. You can also enter a known server address directly.
Log in to OpenSubsonic/Subsonic
Enter the base URL of the server, including any configured subpath. Use your music-server account, which is independent of your Windows user and VirtualDJ account. The plugin detects the server protocol and checks the credentials.
Ampache and LMS require an API key to log in. The relevant information is below Server configuration: API key. Which registration is required for your product is also stated in the column General the compatibility list.
The connection is saved for the Windows user. The plugin stores access data in the Windows credential management.
Log out and switch servers
Right-click to open the menu MusicServer Connect and select the logout command; For example, VirtualDJ shows it as Log out and connect to the desired server. Offline copies and local UPnP playlists belong to a server connection. Open tracks from another server or account through their own connection.
Removes the saved connection and stops active plugin operations. Music files on the server are not deleted. Keep the appropriate connection saved for offline use.
Library and views
All tracks, favourites and random tracks
- All tracks
- All media supplied by the server through the interface in use. Depending on the server, this may include videos. If a file is missing here, check the server catalogue first.
- Favorite tracks
- Titles that you have marked as favorites. Storage differs between UPnP and OpenSubsonic; see Favorites and playlists.
- Random tracks
- A random track selection. Refresh the view to generate a new selection.
- Playlist: …
- Playlists delivered by the server or created in the plugin. More on this below Playlists.
- Offline tracks
- Fully saved offline copies of the current connection. This entry is at the bottom of the tree; Scroll down for many artists or albums.
Show and hide views
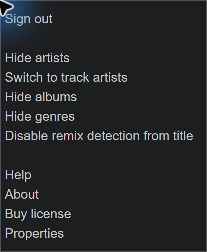
A right click on MusicServer Connect opens tree settings. Use Show/hide artists, Show/hide albums and Show/hide genres Choose which groups are visible. Each menu entry offers the next available action: if it says “Hide”, the group is already visible.
Track artists and album artists
With artists visible, use the same menu to choose between Switch to track artists and Switch to album artists . Track artists group tracks by their individual performers; album artists group a whole album together, including compilations. The selection is saved for this connection.
The artist view changes the grouping in the tree. The column Artist continues to show the artist of the track if the server provides it. Missing information or information summarized by the server can limit the assignment.
Albums and multiple genres
The album view uses the server’s album grouping. Two albums with the same name can be separate server entries. In Navidrome, for example, album grouping can be configured with configure.
A multi-genre title appears under each of these genres. MusicServer Connect uses separate server values and also splits lists like Techno/Hard Trance or Techno; Hard Trance on. Separators in brackets remain part of the genre, for example Techno (Peak Time / Driving). The media files are not downloaded and their tags are not changed. The genre text in the title remains the information provided by the server. Details: Multiple genres.
Smart playlists and special album lists
If the plugin recognizes the server's smart playlists, the root menu also offers Show/hide smart playlists on. The server calculates such lists according to its rules. The plugin does not offer its own rule editor for smart playlists.
OpenSubsonic also appear Newest albums, Most played albums, Recently played albums and Highest rated albums. Their content depends on the information and functions of the server. These album lists are to be distinguished from the smart playlists.
Refresh the library
Open the context menu of a child tree node and select Refresh. The plugin reloads the library view. If it reports that the music library has changed, select the desired entry again in the refreshed tree.
The music server must first add new files to its catalogue. Refreshing the plugin does not replace this server scan. A new track also needs to be registered for the local VirtualDJ search to register.
Search features
Server query and search in the tree node
Choose the plugin root MusicServer Connect and enter a term in VirtualDJ’s search bar to search the server library. Available fields and results depend on the server. Where no suitable UPnP search is available, the plugin can search its imported catalogue.
Within an artist, album, genre or playlist node, VirtualDJ uses its local search database. Displaying a track alone does not register it there. A search at the plugin root may therefore find tracks that are still missing from node searches.
Add all tracks to the search database
- Connect the plugin to the desired server and open All tracks.
- Empty the search field and wait for the full list.
- Click the track list and select Ctrl + A to select all tracks.
- In the VirtualDJ context menu, choose Search DB → Add to database.
- Wait for completion, open the desired tree node and search there again.
This action registers the tracks in the VirtualDJ search database. It does not copy music files or analyse BPM. The exact menu label may vary with your VirtualDJ version and existing database state.
Repeat after adding tracks
Let the server read new files first. Then refresh the plugin view and repeat the recording over All tracks with an empty search field. Previously registered tracks may be selected again. Repeat this process after switching servers.
If matches are still missing, check VirtualDJ’s current-folder search option and enabled search fields, especially title and artist. If a track is absent All tracks, the cause precedes local node search. See also Troubleshooting.
Tracks, playback and metadata
Play audio and video
Drag a song from the list onto a deck or use Load onto in the VirtualDJ context menu. VirtualDJ handles playback, preview, waveforms, analysis and mixing. MusicServer Connect supplies the appropriate server source or an existing offline copy.
You can also load videos from the server. Open VirtualDJ’s video area for preview and output. The server must expose the video through its interface, and VirtualDJ must support its audio and video codecs. The plugin does not modify the file. See Audio and video.
Track menu and multiple selection
Mark one or more titles and right-click to open the context menu. With Ctrl to select additional individual tracks, and Shift a continuous range and use Ctrl + A the complete displayed list.
The first group of commands usually works with adding or switching on. Hold Alt while opening the context menu to select Remove or Disable. You can then release the key. The chosen action applies to all selected tracks, even if their previous settings differ.
Tip about the alternative track menu
The notification does not appear immediately when VirtualDJ starts. VirtualDJ starts the plugin when you first use it. Open MusicServer Connect in the VirtualDJ browser.
Until you have used the Alt track menu, the tip appears once per VirtualDJ session, after a few seconds with MusicServer Connect selected and VirtualDJ in the foreground.
The tip reads: „Hold Alt while right-clicking a track to show a different context menu. Click this notification to open the manual.“
Clicking the notification or its icon in the Windows notification area opens this manual section in the language currently selected in VirtualDJ.
Once you have opened the context menu of an MSC track while holding Alt, the plugin remembers this for your Windows user. The tip will then no longer appear, even after a restart. Simply opening the manual does not turn it off.
Brief keyboard overlay when holding Alt
When you hold Alt, VirtualDJ may briefly show its keyboard mapping overlay. You can still use the MSC context menu. If the overlay bothers you, you can optionally delay it or turn it off.
Option 1: Delay the overlay
The keyboard overview remains available, but appears only after holding Alt for longer. Set the delay in VirtualDJ’s keyboard mapping.
- Leave keyboardShowKeymapOverlay set to Yes. Open Settings → Controllers, select Keyboard and open the mapping editor (Edit Mapping/Advanced Editor).
- Select the ALT key and note its current command. Add the desired delay to the existing keyboard_shortcuts call. Example:
keyboard_shortcuts 1500ms - Save the modified keyboard mapping under your own name and leave it selected.
1500ms means 1.5 seconds. A quick Alt-right-click will then usually avoid the keyboard overlay. MSC still detects the held Alt key immediately; the delay applies to the VDJ keyboard overlay.
You can adjust the time as needed; 500ms means half a second. To undo the change, restore the command you noted earlier. If the ALT assignment contains other commands, change only the keyboard_shortcuts call.
Option 2: Turn the overlay on or off
- Open VirtualDJ settings using the gear icon and select Options.
- Search for keyboardShowKeymapOverlay.
- Set keyboardShowKeymapOverlay to No.
This setting hides the keyboard overlay. Existing keyboard shortcuts and the MSC menu switch with Alt remain available. Set it back to Yes to show the overlay again.
This option does not offer separate choices for Alt and AltGr. The triggering key is assigned in VirtualDJ’s keyboard mapping.
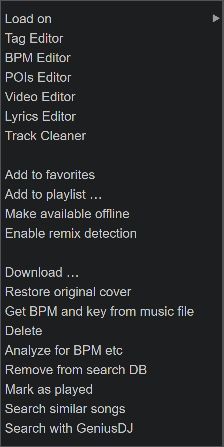
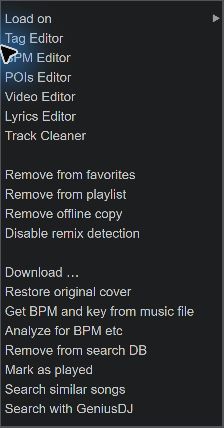
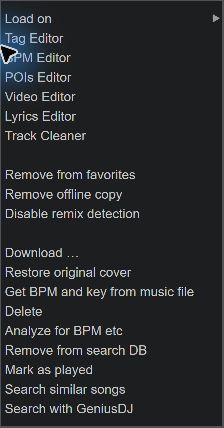
Download …, Restore original cover and Get BPM and key from music file appear below the separate group. These three commands do not change when Alt is held. VirtualDJ adds its own editor and database commands.
The plugin commands for Favorite tracks, Playlists, Downloads, Offline copies, Cover and BPM/Key are explained below. Editors and analysis commands like Tag editor, BPMEditor or Analyse BPM and tags belong to VirtualDJ and have a different effect than the plugin reading out existing file tags.
Detect remix from the title
Global detection takes the contents of the last matching pair of brackets into the remix column and removes this part from the title column. Example: Superfreak (Freak) (Blakkat Remix) appears as the title Superfreak (Freak) with remix Blakkat Remix. A remix field explicitly provided by the server takes precedence.
From version 1.5 onwards, recognition can be set for individual or multiple titles: Enable remix detection in the normal track menu enables it; with Alt appears when opening the menu Disable remix detection. The action applies to the whole selection. The global root-menu setting remains the default for tracks without an individual choice.
Both commands rebuild Title and remix from the source data again. Enable remix detection produces the same values as the first call with detection turned on. Disable remix detection adopts the full source title without separation; an independent remix tag of the source is retained.
If a title or remix was edited in VirtualDJ, a confirmation appears before overwriting it. For a multi-selection, one changed track is enough: the dialog appears once before processing the entire selection. Overwrite replaces both fields of all selected titles with the respective source representation. With Cancel All title and remix values and previous track-specific settings are retained. Other metadata and music files on the server remain unchanged.
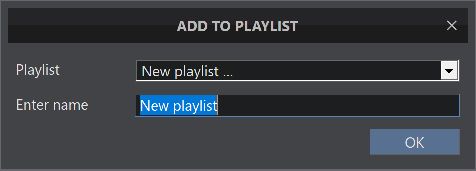
VirtualDJ saves the track-specific choice for the current server connection and account. The same choice applies to repeated occurrences of that track in your own playlists. MusicServer Connect does not create a separate track database.
Determine title artist from FRITZ!Box filenames
If there is a suitable FRITZ!Box connection, this also appears Extract track artist from filename. This optional helper tries to derive a missing artist from the file name supplied by the server as the title. Existing artist metadata takes priority. The result depends on the naming pattern; with Disable track artist extraction from filename turns the feature off again.
This menu item is not available on Gerbera. If Gerbera returns a title like “Artist - Title” despite a separate artist field, check its Configure plain titles in search results.
Read BPM and key
The plugin first uses BPM and key values supplied by the server. Missing values do not prove that the music file has no tags: some servers read them only for certain formats or not at all. Known restrictions are described in the compatibility list.
- Mark the titles you want.
- Choose Get BPM and key from music file.
- Wait for processing. The progress dialog shows the tracks being processed; use Cancel to stop it.
This command reads existing file tags; it does not analyse the audio. The plugin uses an existing offline copy or temporarily downloads the complete file and then removes the temporary file. Large files may therefore take longer. File-tag readers support MP3, FLAC, Ogg Vorbis/Opus, WAV, AIFF and MP4/M4A. Other formats may still provide metadata through the server.
Valid values found are applied to the selected plugin tracks in VirtualDJ and can replace existing BPM/key values. Missing values are shown as Not present displayed. The files and the server database are not changed.
Restore original cover
If the cover is missing, incorrect or outdated, mark the affected titles and select Restore original cover. The plugin reloads the cover currently offered by the music server and updates the display in VirtualDJ. A restart is not required.
The server must be reachable and supply a valid image. No Internet image search is performed. Tags and music files remain unchanged. If saving fails, the previous cover is retained.
Favorites and playlists
Where are changes saved?
| connection | Favourites and editable playlists |
|---|---|
| UPnP/DLNA, e.g. Gerbera | The plugin saves its own favourites and playlists locally for this server connection. These do not change playlist files on the NAS or automatically appear in other clients. Playlists supplied by the server are also read. |
| OpenSubsonic/Subsonic | The plugin uses the server API for favourites and playlists. Changes are saved on the server if your account has the required permissions. Whether other clients can access them depends on the server and its access settings. |
Add and remove favorites
Select tracks and choose Add to favorites. They appear below Favorite tracks. With Remove from favorites deselects it. For the removal command, hold Alt when opening the title menu. The music files are retained. If the view still shows the old status, update it.
Create a playlist or add titles
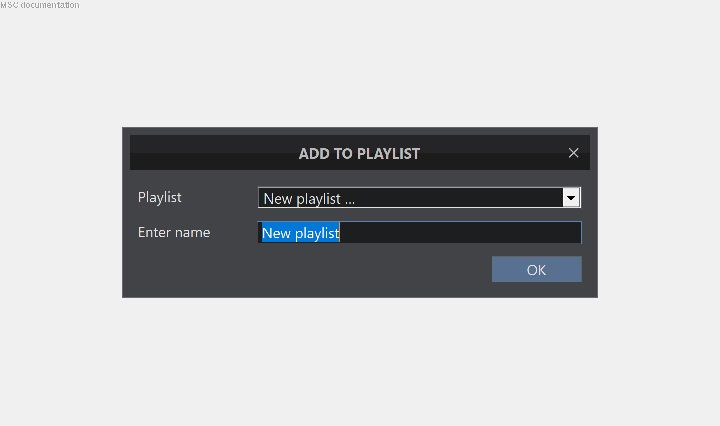
- Mark the titles you want and choose Add to playlist.
- Choose an editable playlist in the dialog. To create one, choose New playlist … and enter a name.
- Confirm with OK. The titles are added to the selected list.
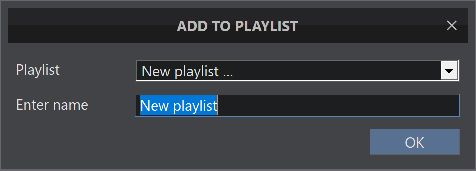
Playlist files imported by a UPnP server cannot be edited with this feature, so they are not offered as editable destinations. If needed, create your own MSC playlist containing the desired tracks. With OpenSubsonic, missing write permissions can prevent changes.
When creating it, the name must be unique. If a playlist with this name already exists, the error message appears A playlist with this name already exists. Please enter a different name. Names differing only in case, leading or trailing spaces, or equivalent Unicode representations count as identical. This applies to local UPnP playlists and server playlists connected through OpenSubsonic/Subsonic. The existing playlist is retained. To add tracks, select that playlist in the dialog instead.
Remove entries and delete playlist
Open an editable playlist, mark the relevant entries and open the context menu by pressing and holding Altkey. Choose Remove from playlist. This command replaces Add to playlist. If a track occurs more than once, only the selected playlist entry is removed. If the list has changed, refresh it and select the entry again.
For the entire list, open the playlist node's context menu and select Delete playlist. The confirmation offers Yes and No. The list is deleted; the music files are retained. These commands are only available for editable playlists.
Order, repeated titles and formats
The plugin preserves the server’s playlist order, including repeated tracks. Sorting columns in VirtualDJ can change the visible order. If a server does not support videos, they may also be absent from mixed playlists. Simply refreshing the plugin cannot repair server import or ordering errors.
The server's software determines which playlist files the server imports. The formats and known deviations are in the Compatibility list. The local MSC playlists are independent of this; the dialog does not create a M3U, WPL or XSPF file.
Downloads and offline use
Download files to a folder
Select tracks and choose Download …. Choose a destination folder for the complete media files. Export uses the download format offered by the server. Unique file names prevent existing files from being overwritten.
Exported files are stored in the selected folder independently of the managed offline cache. You can use them in VirtualDJ like other local files. A failed download is not published as a complete file.
Make available offline
Select for highlighted titles Make available offline. The plugin copies the complete files to its local cache and then shows them below Offline tracks . Videos retain their media type too. Allow enough space for the complete files.
Offline copies belong to the respective server connection and account. They are not a general second music library. Managed storage is below %LOCALAPPDATA%\MusicServerConnect\OfflineCache; remove copies using the menu item in the plugin.
Progress, background and queue
The dialog Making available offline shows the track, item count and copying progress. Background closes the progress view while the jobs continue. Via the context menu of Offline titles → View download queue you open it again.
- Stop
- Terminates the offline jobs that are still running or waiting. Copies that have already been completely saved are retained.
- Remove a queued job
- Removes a selected job from the queue. To delete completed copies, use instead Remove offline copy in the track menu.
- No free memory or copy error
- The plugin reports the problem. Files that have already been completely saved are retained; check storage space and connection before trying again.
Prefer cache or online streams
In the context menu of Offline tracks you choose Prefer cached tracks or Prefer online streams. The menu offers the alternative you can switch to. When the cache is preferred, the plugin uses a valid existing local copy. Without one, an online source is required.
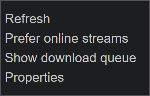
When online streaming is preferred and a local copy exists, the plugin checks server availability and may use the copy if the server is unreachable. For planned offline use, select Prefer cached tracks, keep the appropriate connection saved and check that all required tracks have been copied completely. This does not make a network failure during playback trigger a seamless switchover.
Remove offline copies
Mark the relevant titles and open the context menu by pressing and holding Altkey. Choose Remove offline copy. This removes only the local copy managed by the plugin. The server’s original file and files previously exported to your own folders are retained. Without a local copy, this track needs an accessible online source again.
License, language and help
Open online manual
Right-click MusicServer Connect the context menu and choose Help. The online manual opens in the standard browser. No registration on a music server is required. Follow in the menu Help the entries About and Buy license; the Menu screenshot shows the order.
View version and license status
Open the context menu of MusicServer Connect → About. The dialog shows the plugin version and licence status demo or Valid. Via OK closes the dialog.
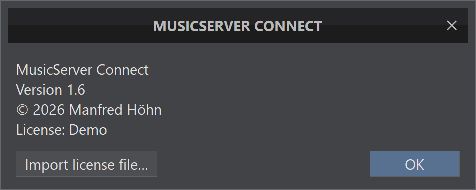
Load a licence file and use the demo
Using MusicServer Connect → Buy license to open the purchase page for your current VirtualDJ account. Sales are not enabled yet. Once available, activation will be automatic; a licence file and PDF invoice will also be offered for download. Please keep both files.
- Log in to VirtualDJ with the account to which the license was issued.
- Open About → Load license file….
- Choose the right one
.licfile and confirm the selection. - After successful activation, the About dialog shows License: Valid.
The VirtualDJ account used for licensing is separate from your music-server account. If a licence is rejected, check its account assignment and file. If your VirtualDJ account is not detected, log in there first.
The regular demo allows up to 20 stream requests and overall ten offline copies. Stream requests are counted separately from distinct tracks. Removing an offline copy does not restore used demo allowance. A valid purchased licence removes these demo limits.
Language and saved settings
Plugin menus and dialogs follow VirtualDJ’s language setting; there is no separate plugin language switch. Untranslated text may appear in English. View and remix settings are stored locally. Track-versus-album-artist selection and optional FRITZ!Box detection are saved per connection.
Troubleshooting
- Server not found or login failed
- Check the server address, port and network connection. Repeat UPnP discovery if necessary. For OpenSubsonic, use the correct server account and an API key where required.
- A track is missing everywhere
- Check the catalog directly in the music server. The server must provide the file and format via its used interface. Then update in the plugin.
- Title visible but not searchable in a tree node
- The Add tracks to the VirtualDJ search database and check the search options for the current folder.
- Artist appears before the title
- Check which title the server is providing. At Gerbera the Configure plain titles in search results use. This is independent of the optional FRITZ!Box determination.
- Album appears multiple times or as unknown
- Check album and album-artist tags and the server’s album grouping. Files without usable tags may appear under original file names. The plugin cannot invent missing album information.
- Playlist contains fewer songs or a different order
- Check server import, supported formats and video support. Sorting a column in VirtualDJ can change the visible order. Known server limitations are listed in the compatibility list.
- Playback fails
- Check connectivity and permissions. Open the same file directly in VirtualDJ to isolate codec problems. If it belongs to another server or account, use the appropriate connection.
- Playlist or favorites action fails
- Update list and check server account rights. UPnP server playlists are read-only; Your own MSC lists can be managed locally.
- BPM, key or cover is missing
- First check effective server and tag mappings. If necessary Read out existing BPM/Key file tags or that Reload server cover.
Further details: Compatibility list · Server configuration · Audio and video